
Easy-Peasy Timeline for Homeschooling
November 16, 2012
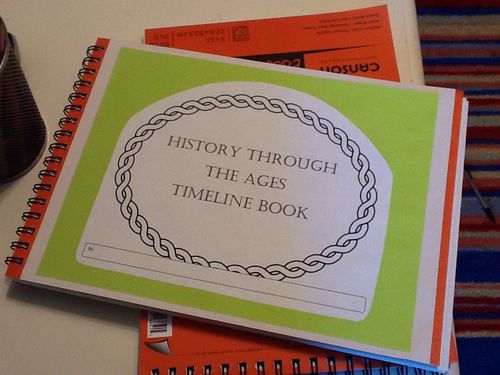
When I was doing my planning for the year, one thing that had me scratching my head was what we would use for a timeline. We started on our second four-year cycle, and we had filled our Book of Time from Sonlight. I wasn’t sure if I wanted to try something different. I also looked at History Through the Ages Record of Time from Homeschool in the Woods. They offer a beautiful timeline book and CDs of printable figures, both of which I may still use at some point.
Being in a rare, crafty mood, however, I wanted to make something with my hands:-)
Brief caveat: I realize that I titled the homemade timelines “History through the Ages.” This is merely because that is what it is… I am in no way trying to steal the title from the fine folks at Homeschool in the Woods.
So, I grabbed a couple of handy, dandy sketchbooks, some colored pencils and a ruler and got to work.
The sketchbooks are about 100 pages long (I was using these timeline instructions from Donna Young’s super helpful website, and I didn’t want to run short.). I also made sure they were perforated, so that I could easily remove pages, and place one neatly over that truly lovely orange cover, ahem…
Then, since I am using Tapestry of Grace as an outline for our curriculum choices this year, I printed out their beautiful Map of the Humanities, which TOG generously offers for free download here. Too bad my color printer was on the fritz… the map isn’t quite as beautiful as it was intended to be.
That’s better… Anyway, I adhered it to some pretty green paper and scored it to fold into itself. Then, I glued it onto one of the first pages in the timeline book, so the kids can refer to it as we move through history.
This is just a little matching band for the folded map. (Told you I was in a crafty mood:-)
Then, using Donna Young’s spacing instructions and my handy-dandy ruler, I simply placed lines at the top of each page about 1″ down and labeled each page with the time period title and beginning and ending dates in the appropriate color. (Donna’s timeline instructions assign different colors to different time periods. For example, Ancient Civilizations, shown above, are in green pencil. When you get to The Classical World, you change your pencil color to blue. Pretty, isn’t it? And, really, is there anyone who doesn’t like color coding?)
Voila! A cheap and (relatively) easy timeline book that the kids can customize.
(I am just how noticing that my dear boy wrote my name on his timeline book. When I asked him why my name was on his book, he said, “Oh, sorry about that. I thought that since you made the book, it was ‘by’ you.” You can tell this little guy is the son of a writer:-)
This is also a project that your kids can make themselves. The labeling of the time periods can get a little putsy, but you can certainly split that up into different sessions, instead of ding it all at once like I did. Happy crafting!